Pytest入门系列之pytest和Allure结合详细指南
在企业级测试中,pytest + Allure 是生成 美观、详细、可交互测试报告 的最佳实践。
它适用于:
✅ API 自动化测试
✅ UI 自动化测试(Selenium、Appium)
✅ 数据库测试
✅ CI/CD 持续集成(Jenkins、GitLab CI/CD)
安装 pytest-allure
📌 安装 allure-pytest
1
| pip install allure-pytest
|
📌 安装 Allure Commandline
Windows: https://github.com/allure-framework/allure2/releases
Mac/Linux
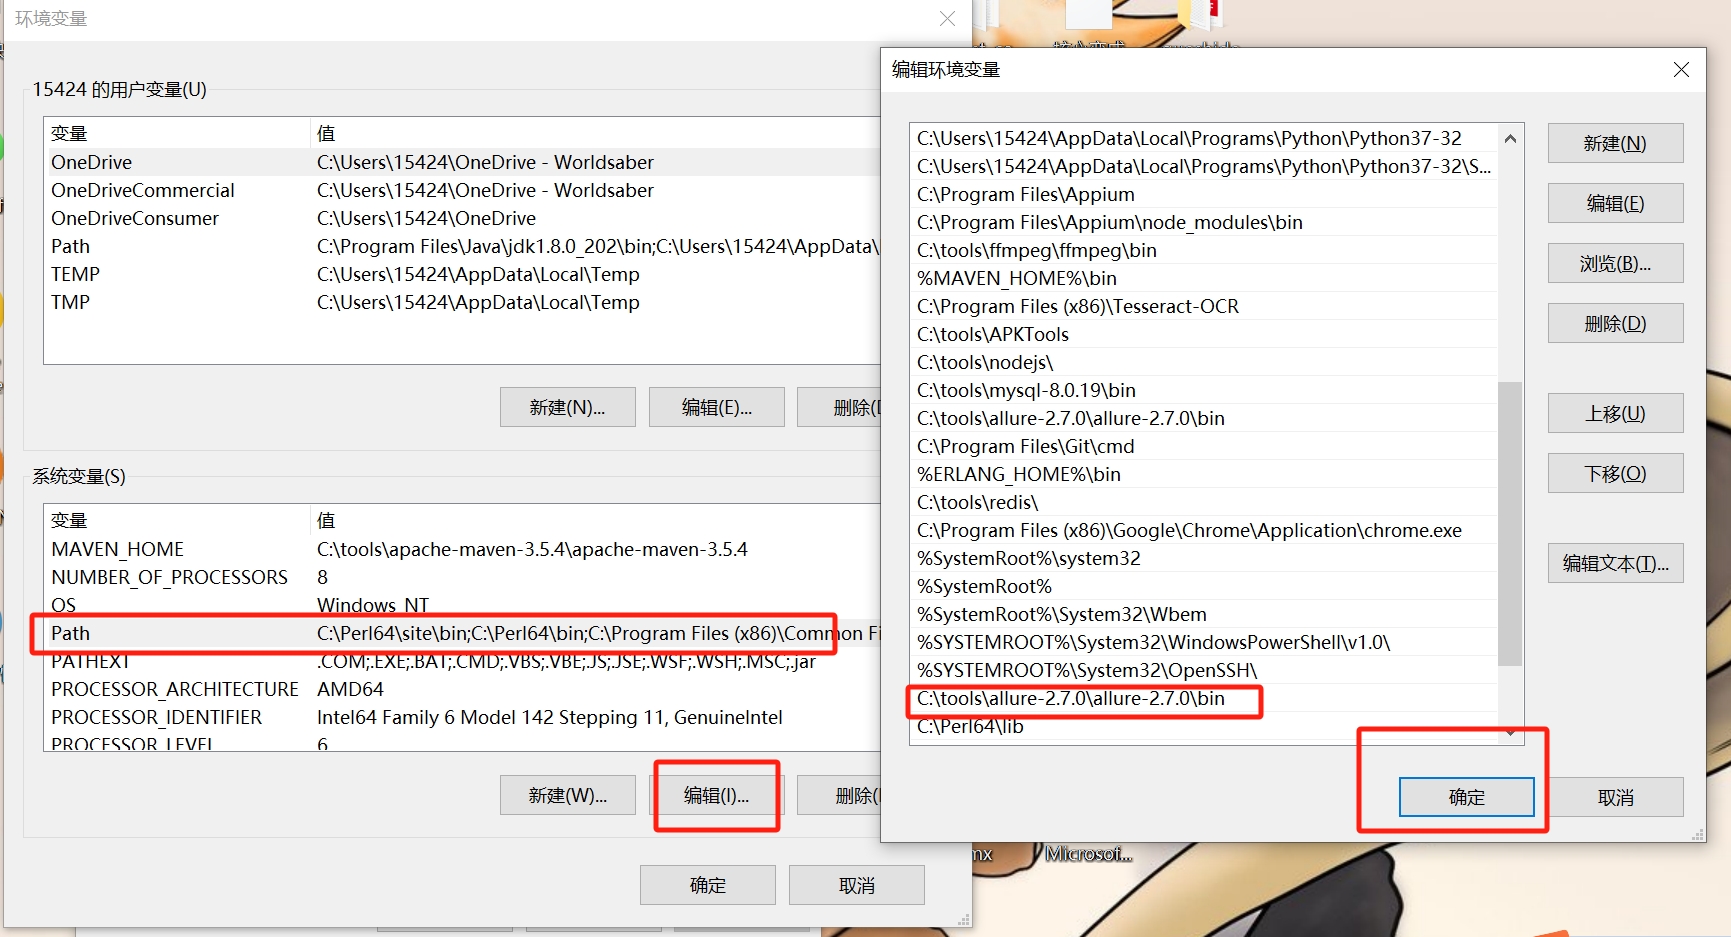
📌 windows 下的环境变量配置
📌 验证安装
✅ 显示版本号,说明安装成功!
运行测试并生成 Allure 报告
📌 执行 Pytest 并生成 allure 结果
1
| pytest --alluredir=./allure-results
|
📌 生成 HTML 报告
1
| allure serve ./allure-results
|
✅ 浏览器自动打开 Allure 报告!
📌 静态资源文件报告(带index.html、css、js等文件),需要将报告布置到web服务器上。
✅生成报告。
--clean:如果报告路径重复,清理上一次的报告
1
| allure generate ./results --clean
|
✅-o:将测试报告生成指定的目录
1
| allure generate ./results --clean -o ./reports
|
✅打开报告
1
| allure open allure-report
|
✅打开报告指定IP地址和端口号
1
| allure open ./reports -h 127.0.0.1 -p 8888
|
✅ pytest.ini 中的配置
1
2
3
4
5
6
7
8
9
| [pytest]
addopts = -v -s --tb=short --alluredir=./allure-results --clean-alluredir
python_files = check_*.py test_*.py *_test.py
log_level = DEBUG
log_cli = true
log_format = "%(asctime)s [%(levelname)8s] %(message)s (%(filename)s:%(lineno)s)"
log_date_format = "%Y-%m-%d %H:%M:%S"
log_file = logs/pytest.log
log_file_level = INF
|
📌 如果需要每次运行完毕后打开报告,可以在conftest.py 中定义一个钩子函数,在执行完毕后打开我们的测试报告。
1
2
3
4
5
|
def pytest_unconfigure(config):
print("打开allure报告.")
import subprocess
subprocess.run("allure serve allure-results", shell=True)
|
使用 @allure.feature 和 @allure.story 分类 API 测试
📌 作用:
@allure.feature() → 模块级别
@allure.story() → 功能级别
🔹 代码示例
1
2
3
4
5
6
7
8
9
| import allure
import requests
@allure.feature("用户管理")
@allure.story("用户登录")
def test_login():
response = requests.post("https://jsonplaceholder.typicode.com/posts", json={"username": "admin", "password": "123456"})
assert response.status_code == 201
|
📌 在 Allure 报告中,测试会按照 feature 和 story 分类
使用 @allure.step() 记录 API 请求步骤
📌 作用:
✅记录 API 请求的关键步骤
✅测试失败时,提供详细日志
🔹 代码示例
1
2
3
4
5
6
7
8
9
10
11
12
13
| @allure.feature("API 测试")
@allure.story("获取用户信息")
def test_get_user():
with allure.step("发送 GET 请求"):
response = requests.get("https://jsonplaceholder.typicode.com/users/1")
with allure.step("校验 HTTP 状态码"):
assert response.status_code == 200
with allure.step("校验返回数据"):
data = response.json()
assert data["id"] == 1
|
📌 Allure 报告会清晰展示 API 请求的步骤
使用 @allure.attach() 记录请求/响应数据
📌 作用:
✅记录 API 请求参数、响应数据
✅测试失败时,方便排查问题
🔹 代码示例
1
2
3
4
5
6
7
8
9
10
11
12
13
14
15
16
17
18
| @allure.feature("API 测试")
@allure.story("创建用户")
def test_create_user():
url = "https://jsonplaceholder.typicode.com/users"
payload = {"name": "John Doe", "email": "[email protected]"}
with allure.step("发送 POST 请求"):
allure.attach(str(payload), name="请求数据", attachment_type=allure.attachment_type.JSON)
response = requests.post(url, json=payload)
with allure.step("校验 HTTP 状态码"):
allure.attach(str(response.status_code), name="响应状态码", attachment_type=allure.attachment_type.TEXT)
assert response.status_code == 201
with allure.step("校验返回数据"):
allure.attach(response.text, name="响应数据", attachment_type=allure.attachment_type.JSON)
assert response.json()["name"] == "John Doe"
|
📌 Allure 报告会显示 API 请求的 JSON
allure.attach.file() 添加文件(Excel、日志、截图)
📌 作用:
✅上传 Excel、日志文件
✅Selenium 失败时截图
🔹 代码示例
1
2
3
4
5
6
7
| import allure
@allure.feature("数据导入")
def test_upload_excel():
allure.attach.file("test_data.xlsx", name="Excel 数据", attachment_type=allure.attachment_type.CSV)
assert True
|
📌 Allure 报告中,Excel 文件可下载查看
📌 Selenium 结合 allure.attach.file()进行截图
🔹 代码示例
1
2
3
4
5
6
7
8
9
10
11
12
13
14
15
16
| from selenium import webdriver
@allure.feature("UI 测试")
@allure.story("登录页面")
def test_ui_login():
driver = webdriver.Chrome()
driver.get("https://example.com")
try:
assert "登录成功" in driver.page_source
except AssertionError:
driver.save_screenshot("failure.png")
allure.attach.file("failure.png", name="失败截图", attachment_type=allure.attachment_type.PNG)
raise
finally:
driver.quit()
|
📌 测试失败时,Allure 报告会自动添加截图
使用 @allure.severity() 设置测试优先级
📌 Allure 提供 5 个严重级别
✅BLOCKER:关键问题,必须修复
✅CRITICAL:严重缺陷
✅NORMAL:普通问题
✅MINOR:次要问题
✅TRIVIAL:提示信息
🔹 代码示例
1
2
3
| @allure.severity(allure.severity_level.CRITICAL)
def test_critical_bug():
assert 1 == 2
|
📌 Allure 报告会突出显示 CRITICAL 级别的失败测试
结合 pytest.mark.parametrize 进行 API 测试
📌 作用:
✅批量测试 API 请求
✅不同参数自动生成多组测试
🔹 代码示例
1
2
3
4
5
6
7
8
9
10
11
| import pytest
@allure.feature("API 测试")
@allure.story("不同用户获取信息")
@pytest.mark.parametrize("user_id", [1, 2, 3])
def test_get_users(user_id):
with allure.step(f"查询用户 ID: {user_id}"):
response = requests.get(f"https://jsonplaceholder.typicode.com/users/{user_id}")
allure.attach(response.text, name="响应数据", attachment_type=allure.attachment_type.JSON)
assert response.status_code == 200
|
📌 Allure 报告会显示多个用户请求结果
失败时自动截图(适用于 UI 测试)
📌 适用于 Selenium 自动化测试
🔹 代码示例
1
2
3
4
5
6
7
8
9
10
11
12
13
14
15
16
17
18
19
20
21
22
23
24
25
| from selenium import webdriver
@allure.feature("UI 测试")
@allure.story("登录页面")
def test_ui_login():
driver = webdriver.Chrome()
driver.get("https://example.com")
with allure.step("输入用户名"):
driver.find_element("id", "username").send_keys("test_user")
with allure.step("输入密码"):
driver.find_element("id", "password").send_keys("123456")
with allure.step("点击登录"):
driver.find_element("id", "login-button").click()
try:
assert "欢迎" in driver.page_source
except AssertionError:
allure.attach(driver.get_screenshot_as_png(), name="失败截图", attachment_type=allure.attachment_type.PNG)
raise
finally:
driver.quit()
|
📌 测试失败时,Allure 报告会自动添加截图
结合 CI/CD 自动生成报告
📌 Jenkins Pipeline
🔹 代码示例
1
2
3
4
5
6
7
8
9
10
11
12
13
14
15
16
17
18
19
20
21
22
| pipeline {
agent any
stages {
stage('Run Tests') {
steps {
sh 'pytest --alluredir=allure-results'
}
}
stage('Generate Report') {
steps {
sh 'allure generate allure-results -o allure-report --clean'
}
}
stage('Publish Report') {
steps {
publishHTML([allowMissing: false, alwaysLinkToLastBuild: true, keepAll: true,
reportDir: 'allure-report', reportFiles: 'index.html', reportName: 'Allure Test Report'])
}
}
}
}
|
📌 Jenkins 自动生成 Allure 报告并展示在网页
allure.dynamic.title() 动态更新测试标题
📌 场景:
✅根据 不同参数 生成 不同测试标题
✅适用于 数据驱动测试(DDT)
🔹 代码示例
1
2
3
4
5
6
7
8
| import allure
import pytest
@allure.feature("用户管理")
@pytest.mark.parametrize("username, password", [("admin", "admin123"), ("user1", "pass123")])
def test_dynamic_title(username, password):
allure.dynamic.title(f"登录测试 - 用户名: {username}")
assert username == "admin"
|
📌 Allure 报告中,每个测试用例的标题不同:
1
2
| ✅ 登录测试 - 用户名: admin
✅ 登录测试 - 用户名: user1
|
@allure.title() 静态自定义测试标题
📌 场景:
✅用于手动定义 固定的 测试标题
🔹 代码示例
1
2
3
4
5
| @allure.feature("订单管理")
@allure.title("测试创建订单功能")
def test_create_order():
assert "order" in "order_123"
|
📌 Allure 报告中的标题会展示:测试创建订单功能
@allure.description() 添加测试用例描述
📌 作用:
✅详细描述 测试用例的目的、步骤、期望结果
✅增强可读性
🔹 代码示例
1
2
3
4
5
6
7
8
9
10
11
12
| @allure.feature("支付系统")
@allure.story("微信支付")
@allure.title("微信支付 - 订单成功测试")
@allure.description("""
### 测试步骤:
1. 创建一个订单
2. 选择微信支付
3. 模拟支付成功
4. 校验订单状态
""")
def test_wechat_pay():
assert True
|
📌 Allure 报告中,测试用例会有详细描述
在 Allure 报告中添加用例链接
📌 作用:
✅关联 Bug、TestCase、文档
✅点击链接可跳转到 JIRA、Testrail、需求文档
🔹 代码示例
1
2
3
4
5
6
7
| @allure.feature("用户管理")
@allure.issue("https://jira.company.com/browse/BUG-1234", "JIRA Bug 1234")
@allure.testcase("https://testrail.company.com/testcase/5678", "测试用例 5678")
@allure.link("https://wiki.company.com/test-plan", name="测试计划")
def test_with_links():
assert True
|
📌 Allure 报告中,会显示可点击的链接
修改 Allure 页面 LOGO
📌 自定义 LOGO 适用于企业品牌化
🔹 修改 Allure 主题
✅修改 allure-report/widgets/summary.json
1
2
3
4
5
| {
"reportName": "公司内部测试报告",
"logo": "https://company.com/logo.png"
}
|
✅重新生成报告
1
| allure generate allure-results -o allure-report --clean
|
📌 修改后,``Allure报告页面显示公司LOGO`
总结
| 代码示例 |
功能 |
@allure.feature("用户管理") |
分类 Feature/Story |
with allure.step("步骤名"): |
添加测试步骤 |
allure.attach(driver.get_screenshot_as_png(), "截图", allure.attachment_type.PNG) |
失败截图 |
environment.properties |
添加环境信息 |
@allure.severity(allure.severity_level.CRITICAL) |
设置优先级 |
allure.dynamic.title(f"测试 - {param}") |
动态更新标题 |
@allure.title("固定标题") |
静态标题 |
@allure.description("详细测试步骤") |
测试描述 |
allure.attach.file("file.png", name="截图") |
上传文件 |
summary.json |
修改 LOGO |
🎯 pytest + allure 让自动化测试报告更专业,适用于企业级 CI/CD 🚀